While knowing how to use an angle grinder is crucial to getting your jobs done, knowing its parts is helpful when anything goes wrong. After all, you need to know your angle grinder parts name before fixing it or getting a spare part.
This article will help you identify the most popular parts of an angle grinder and their functions.
Contents
List Of Angle Grinder Parts Name With Functions
The components of an angle grinder are classified into two groups: mechanical parts and electrical parts.
1. Mechanical parts
All the essential mechanical parts of Bosch, Makita, Milwaukee, etc. angle grinders look the same. In this article, I take pictures from the DeWalt grinder that I’m using now.
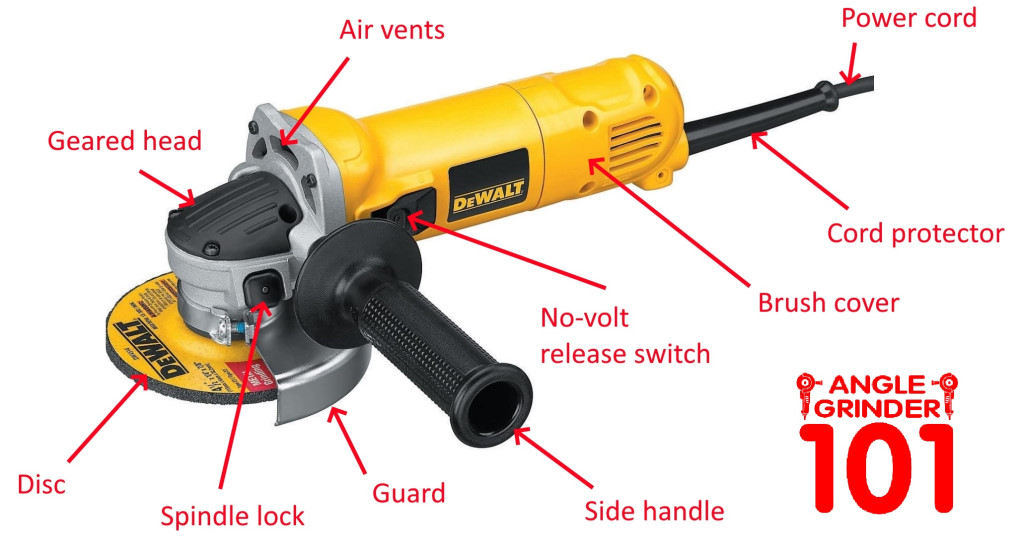
Disc
An abrasive disc (or abrasive wheel) is a vital part of an angle grinder. This part is often purchased separately and is secured with the grinder’s spindle with a special nut.
Angle grinder discs are available in a wide range for different purposes, like cutting, grinding, or polishing materials. Thus, you can choose a disc that is appropriate for your current task.
When picking a disc for your tool, you should ensure that its maximum speed (often printed on the product label) is equal to or more than the maximum rotating speed of your angle grinder. If the disc’s safest operating speed is lower than that of the grinder, don’t use that disc as there will be shatter once the grinder works at its maximum speed.
Additionally, don’t use a disc that passed its expiry date, as it can cause damages to the device and injuries to you.
Geared head
A geared head is placed at the front of an angle grinder and consists of bevel gears that deliver the energy from the electric motor to the spindle.
You can check the direction of the spindle by checking the arrow at the front of the geared head.
Spindle & Spindle lock
A spindle is located under the geared head and at the right side of the motor. When the angle grinder is working, this part will turn at a high speed to drive the grinder’s disc or attachment. Most spindles have an outer diameter of 14mm or an M14 thread pitch.
Every spindle goes with a safety part called a spindle lock to prevent it from rotating while switching discs or attachments. You can activate this lock by keeping the lock button, then rotating the spindle until it can’t spin anymore.
Guard
Almost every angle grinder goes with a protective guard to protect you from flying metal debris or hot sparks while the tool is working.
To effectively use this safety part:
- Never remove the guard while working with the tool.
- Always choose the guard that fits with your grinder’s disc or attachment. For example, a Type 14 disc should go with a Type 14 guard.
- Adjustable guards are better. You can rotate the guard and modify the side handle so that you always sit behind the guard and on the same side with the side handle.
Side handle
A side handle (or an auxiliary handle) helps you use the power tool with better stability and safety.
A 2-position removable handle can be attached on either side of the geared head with an integral screw, meaning that you can use your tool with either left or right hand. You can also change the handle’s position if it is preventing you from reaching specific angles.
Air vents
These air vents cool down the angle grinder and keep it from overheating while operating at high speeds. You should always ensure that they are free of dust and debris.
No-Volt release switch
On some latest angle grinder models, there is a No-Volt release switch to prevent the tool from accidental starts. This switch has to be reset before plugging in the device.
There are two other ways to use this switch:
- First, push it halfway so that the tool can only work when you are applying pressure.
- Second, move it further to lock it in position when you need the device to operate continuously.
Brush cover
On angle grinders that run on a carbon brushed motor, there is a brush cover to protect the engine from damages, dust, and debris.
When the carbon brushes need a replacement, you should unscrew the brush cover from the tool’s main body to take the old brushes from the motor.
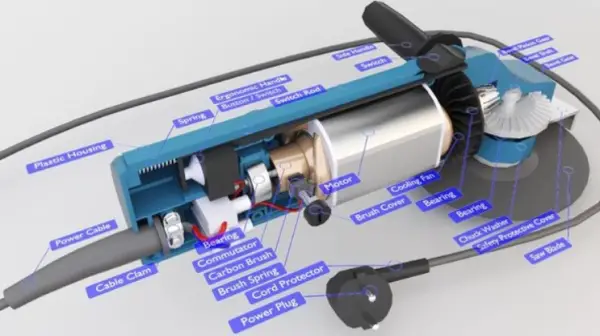
2. Electrical parts
There are various electrical parts of an angle grinder. In this article, I will only list down some most popular pieces.
Cord protector/Cable sleeve
A cord protector (or a cable sleeve) is made of high-quality rubber to protect the electrical cord from being bent or exposed, leading to safety hazards.
You can apply this sleeve onto your grinder’s cord by sliding it and resting it securely at the end. And remember to change it as soon as you notice any small cracks on it.
Power cord
The power cord is often seen on corded angle grinders and other power tools like jigsaws, electric drills, routers, etc. It is a thick, double-insulated rubber cord with two wires and no ground wire.
You should replace this part when there are breaks in the cord insulation, damaged bent prongs, or intermittent power. To replace it with a new one, you need a screwdriver, crimping tools, wire cutters/strippers, and a terminal.
While installing the cord with the angle grinder, always remember that wires must go correctly into its terminals. You should also put the cord and wires in their correct path to avoid pinching when putting the grinder’s cover into place.
Rotor blade
A rotor blade maintains a constant airflow inside the cylinder, keeping the motor cool while operating for an extended period.
To protect the tool from overheating, you should regularly check the rotor blade and replace it when cracked, damaged, or chipped.
Brush
A brushed motor (on the angle grinder models that run on a carbon brushed motor) consists of many carbon brushes (or motor brushes). Each brush is made of sturdy carbon alloy and connected with a lead wire. Its primary purpose is to generate electrical current from the stationary wires to the tool’s motor.
The brush is also an electrical part that needs frequent replacement because it can gradually wear away through regular use. Using a worn brush on a high-powered tool like an angle grinder can lead to reduced motor power or reduced electrical braking. And even if there is a worn brush, you should replace both brushes for a safe and efficient working operation.
Clamping nut
A clamping nut is a fastener that is used to secure two or more objects together.
You can tighten or loosen a clamping nut with an adjustable wrench or ratchet. When there is a significant required force to lock the mechanical parts together, you can use a torque wrench.
Flange nut
A flange nut links the grinder’s arbor (spindle) to the grinding wheel/attachment. It has a diameter of approximately 5/6-inches and is secured in place with a spanner wrench.
Extra Parts/Features That The Best Angle Grinder Should Have
Dust ejection
A dust ejection (or dust ejection system) is commonly used on high-quality angle grinders to prevent flying dust and debris from reaching the electrical motor via the cooling fan. This system forces all small particles out of the grinder’s housing.
Overload protection
Overload protection is a valuable safety feature, especially when you have to tackle challenging jobs or use the grinder for long hours. It prevents the tool from overheating by automatically turning off its motor power until cooled down.
Anti-vibration handles
Anti-vibration handles reduce the tool’s vibration up to 70% for more comfort. Thanks to the rubber cushioning barrier between the anti-vibration handle and the spindle, you can control and maneuver the tool easier with higher accuracy.
Soft-start function
The soft-start function is commonly found on large angle grinders. By allowing the tool to speed up to its maximum speed gradually, this function reduces sudden ‘kick’ on start-up.
Slim case
An angle grinder with a slim, streamlined case is lightweight and easy to control in tight or odd-shaped spaces. This case also makes the tool comfortable to hold for an extended period.
Keyless safety guard
The keyless safety guard can be applied, removed, or adjusted without any unique tool. This part is helpful in working environments when the device has to be modified regularly to adapt to various applications.
Pop-Off Brushes
Apart from regular brushes, pop-off brushes will automatically break contact and make the tool shut down immediately when they need a replacement. Thus, the motor will be saved from damages.
Sealed bearings
Bearings are sealed to protect themselves from dust, thus helping maintain a smooth rotation for the motor. For extra protection, there is even a round plastic seal between the sealed bearings and the motor.
Quick disc release system
The quick disc-release system saves a lot of time when switching between many discs and attachments. In other words, you don’t have to use any tools to install or remove discs, attachments, or backing flanges.
How Do You Assemble An Angle Grinder?
To assemble a new angle grinder:
- Step 1: Remove your angle grinder from the box, and undo the power cord. Ensure that everything is tight and operational before plugging in the power cord.
- Step 2: Place the guard over the collet and opposite the body of the angle grinder. Tighten the guard with a screwdriver.
- Step 3: Attach the handle to either the left or right side of the tool’s body. Screw the handle until it’s tight so that it can’t move suddenly and cut your hand.
- Step 4: Remove the retainer, and put the disc onto the spindle. The printed side of the disc always goes to the back. Then, place the retainer flat side down.
- Step 5: Press the button to stop the disc from rotating, then tighten it with a screwdriver, but not too tight. Your angle grinder is now ready to use.
FAQs
1. What is the nut on an angle grinder called?
The nut on an angle grinder is called a spindle, or sometimes arbor.
2. Are angle grinder nuts universal?
Yes, they are a universal thread tool. You can use them on other furniture, like tables, beds, chairs, etc.
3. What is a paddle switch on a grinder?
A paddle switch is an excellent replacement for the traditional lock-on switch. When holding the side handle, you can also hold down the switch that keeps the grinder working.
If you lose control of the machine and remove your arm from the paddle switch, the tool will automatically turn down.
Final Words
After learning the angle grinder parts name, you understand that while an angle grinder might seem a simple tool, it consists of many small mechanical and electrical components and additional features that you need to learn how to use.
Now you can quickly identify the faults of your angle grinder, repair your tool with less time and effort, or purchase replacement of the broken part with more confidence.
It is good grinder for using